To Vietnam: Huế

We arrived at Huế in the afternoon. As we made our way out of the railway station, we noticed the absence of Uber in the area. So, we settled for USD5 for a Toyota Innova to carry us with our baggage to the Serene Shining Hotel. The hotel was quite a nice one, with rooms facing the river. But, we did not have time to enjoy the views from the hotel, for we were already late for the day’s plan.
Huế has a lot of tombs scattered all over the place and the imperial citadel as its main attraction. There is also a bridge, Truong Tien Bridge, on the Perfume river, designed by none other than Gustave Eiffel. Now, the problem was that all the tombs and temples and pagodas close for the day by 1700h, and it was about 1600h already. We decided to skip the tombs all together, and went directly to the Thien Mu Pagoda.

A boat on the Perfume river, Hue, Vietnam

We had hired a couple of bikes for us, cost us USD 25 for 24h. Fuel extra. So, Ritwik and Ankita were on one bike, while Manas and I followed them. The roads are wide, clean and people seem to follow the traffic rules here better than Hanoi. So, without any scare or incident, we made it to the pagoda. It was beautiful, peaceful and serene.

The Thien Mu Pagoda, Hue, Vietnam

Incense sticks, prayers, Thien Mu Pagoda, Hue, Vietnam

Since we were in no hurry, we spent quite some time there. While Manas and Ankita sat on the stairs of the pagoda, listening to distant chants from boats on the river, I and Ritwik were experimenting with long exposure shots of the gates of the pagoda.

Gates of the Thien Mu Pagoda, Hue, Vietnam

Then, some time later, as the dusk had passed and night descended, we rode our bikes on the way back. Agenda, to take shots of the Truong Tien Bridge.

On the way we passed the citadel, which has a huge flagpost and a gigantic Vietnamese flag fluttering in the wind. Looked nice. Took a shot 🙂

The Vietnamese Flag, Imperial Citadel, Hue, Vietnam

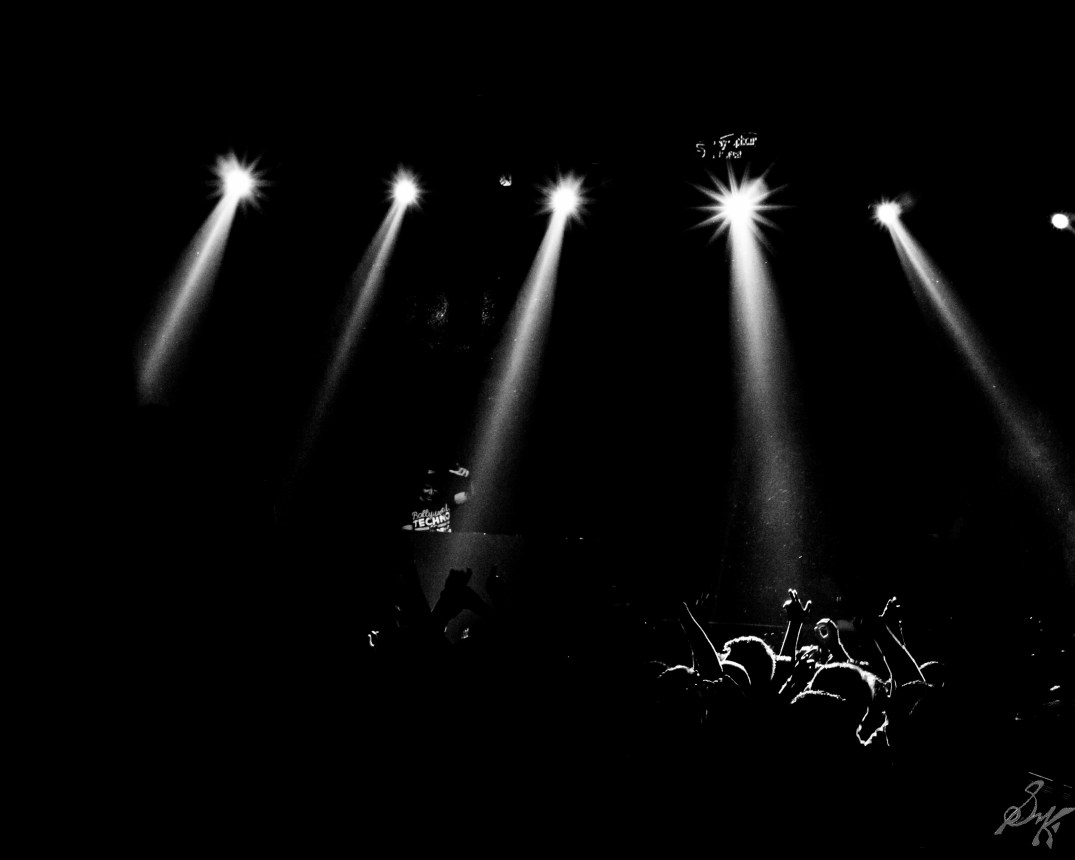
In my opinion, the best view of the Truong Tien bridge will be from the parallel, Phu Xuan bridge with a wide angle lens, 18mm-ish. Since the parallel bridge was under renovation, we chose a park kind of place, between the bridges on the citadel side bank and set up our cameras.

The Truon Tien bridge, Hue, Vietnam

The Perfume River, Hue, Vietnam

I found the results quite satisfying. To watch the water of the river turn into a mirror and to get the glittery lights with starbursts, I was happy.

We had our daily dose of Banh Mi for dinner, and rode our bikes back to the hotel. Be aware, in the evening, you will find men on bikes, come at you with offers of girls, marijuana and cocaine. Tread carefully. The Phú Hội district of Huế is a hotspot for tourists, with numerous bars and backpackers hostels all around.

Next day, we would be off to the citadel. But for now, a couple of beers and a good night’s sleep was on the charts!

Cheers!!

AtoZ Challenge: The Glossary

The AtoZ Challenge has already come to an end for the second time, and as a result, now a glossary of the terms can be made. I believe this shall come handy for future references!

A – Aperture, Artificial Horizon

B – Bulb Mode, Bokeh

C – Colour Temperature, Composition

D – Double Exposure , Depth of Field

E – EXIF Data, Exposure Bracketing

F – Forced Perspective, Focus Stacking

G – Ghosting, Grain

H – Hot Shoe, Hyperfocal Distance

I – Infinity Focus, ISO

J – Juxtapose, JPEG vs RAW

K – Keylight, Kelvin

L – Latitude, Lens Distortion

M – Manual Mode, Macro

N – Normal Lens, Noise Reduction

O – Optical Zoom, Overexposure

P – Panning, Post Processing

Q – Quality, Quiet Release

R – Red Eye Reduction, Rear Curtain

S – Spot Metering, Shutter Speed

T – Tonal Range, TTL Metering

U – Urban Landscape, Underexposure

V – Vignetting, Vibration Reduction

W – Watermark, White Balance

X – X Speed, X Process

Y – Your Rapport, You

Z – Zoom (Digital), Zoom Burst

Have a look at these terms and let me know if I ought to add some to the list.

Cheers!!

AtoZ Challenge: K – Keylight

Keylight

Often referred to as the most important light in the photo, it is the one which makes your photo come alive in terms of depth and dimensions. One needs to choose their primary source of light and its use or the lack of it can create varied effects, as intended by the photographer. While making a light map of the shoot, generally, the key lights are the first ones which are put into place.

The following shot was taken without a key light in place.

Bubbles in focus, no key light

Now, with the introduction of a key light into the scene, the results, I find, are quite adorable 😉

Key Light being used for lighting

It is easy to realize that having a key light can mean a lot of difference in the final photo.

Immense thanks to Tuhina for being my model over and over again.

Last time, for K, it was Kelvin.

Go ahead and shoot some stunning portraits.

Cheers!!

AtoZ Challenge: B – Bulb Mode

Bulb Mode

Normally, a camera shall let us slow down the shutter speed till 30 seconds, but suppose we need an exposure of a minute, what do we do then?? We use the Bulb Mode.

30 Second Exposure setting on Nikon D7200
This mode shall keep the shutter open for as long as the shutter button is pressed. Ideal for use with astro photography and shots of milky way!
Bulb Setting on Nikon D7200

Go out there and shoot some milky way shots. I want to, someday soon, I will.

Last time, B was for Bokeh!

Cheers!!


Bokehs and Starbursts!

There are some amazing things one can shoot during night. Long exposure shots of light trails, amazing bokehs, starbursts, star trails, and much more.
Tonight, like many before, I was at office past sundown, and I had camera with me. Had a concept to try out too. So, off I went to the terrace to try out the shot.

Western Express Highway at night, bokehs of the lights

While I was up there, the Mahim bay glittered and tempted me to take the long exposure shot. Looks damn nice, right? Worth climbing up to the terrace for a peek!

Long Exposure shot of the Mahim Bay, Bandra Worli Sea Link in background

Something I noticed, while processing the photos, if you suspect that there may be some dirt on your lens, shoot a bokeh at night, the dirt ll show up as a shadow in the orb!

Guess I need to clean the prime!

Cheers!!

Mumbai : Clouds and Rain

Hi there all,

As it must be evident by the sheer number of posts that I manage to post, I do not get a lot of time to pull out the camera and go shooting. Add to that the famed monsoons of Mumbai. Days of incessant rain, followed by a hot and humid sunny day, and then suddenly, out of no where, rain again, transient weather I say! Clothes damp and soggy, fungus just waiting to grow anywhere they can, it is difficult.

Not to be disheartened and following the concept of the best camera is the one you have on you, I turn to using the Lenovo K6 Power to shoot. Once better climates prevail, my beloved NikonD3100 shall come back in action.

Until the next post!

Cheers!!


The ones that didn’t win – I

I have, till date, taken part in quite a few photography competition. Some I have won, some I haven’t. The ones in which I won, or at least got the photos exhibited, those photos got some of the limelight that I would have wanted them to get. But what about the ones that didn’t win? When I made those photos, I made them as dearly as the ones who won, so why should they not be shared ? They ought to be.
With this thought in mind, here begins another series of photos. One photo per post. Let me know dear readers about your take on the photos.

dsc_0002-1

This photo here is of a man working on the kite strings. He has been in the profession since he was 16 years old and now he’s close to 50. What do his kids do? The daughter goes to school, and the son helps him with the business – Ahmedabad, 12/2016.


Glimpses of Mumbai – Nana Chowk, Grant Road

In my previous post, I mentioned that I take a tiny hop to a place to shoot a very particular signal, well, this is the one. Whats so special about it, you may ask, well, it was a pre decided and pre conceived shot. I knew the angles, knew the locations, just went in and took the shot.

Here are the results.

DSC_3884-1

DSC_3919-3

The first photo is a product of a merging of 4 photos shot in quick succession from the same location, settings unchanged and then merged in Photoshop.

The next post, is one that is long overdue. I climbed the top floor of the site of my work, with the camera and shot Mumbai. The results, shall form the next post. Keep an eye out.

Cheers!!

What type of photog am I?

A question has been often posed at me, what kind of photographer am I? Today, I ll try to answer it.

I am in pursuit of photography with some seriousness, for the past two and a half years now. My peers, who had started along at the similar time, have become specialized. Some shoot only portraits, some are landscape guys while some are wildlife fellows. They have expanded their arsenal with better bodies and lens…and then there is me.
I have not managed to settle down to just one genre yet.
I like shooting portraits.

 DSC_4403  DSC_5801-13

Also enjoy shooting landscapes.
DSC_8009-23

DSC_5725

DSC_6677-24

I am not averse to shooting macro

DSC_6802-1

DSC_6971-2

DSC_6992-6

And even the streets appeal to me just fine.

DSC_a-3103

DSC_a-0087

DSC_a-0123

And sometimes, I do shoot purely technical shots too.

DSC_7859-7-1

DSC_4466-2

I guess, I am just not cut for the strict regime of just one type of photography. Some might say that I am straying and that I must stick to a certain genre, but I’d rather shoot things that appeal to me,even if they belong for different genre. It brings out the me in the photos. This my calling, whats yours?

If things go according to plan, as they rarely do, next week, I shall be travelling to Velas, Maharashtra, to visit the tiny turtles hatch and make their maiden journey to the sea. Stay tuned.

Cheers!!

10 Hacks to stunning portraits

Photographs are generally classified on terms of locations, themes, stories they depict, subjects they focus on, so on and so forth. As the multitude of classifications exist, so are the personal favourites. My favourite is portrait.
The main objective of the portrait from my point of view is to portray certain emotion, or a certain feeling through the photo.  My model should be the point of focus, and the emotions felt, the expressions emitted should be captured in the best of possibilities. If I manage to show to my audience, what my subject felt while the shot was taken, I feel, its a good portrait.

Today, I shall put down certain points which I feel are important while taking portraits. I keep these points in my mind while shooting and so far, they have served me well.

1. Focus on the eyes: The first rule, by me, is the focus should be on the eyes. Not on the nose, not on the lips, the EYES. Why? Because consciously or not, that’s the first thing that catches our eye in the photo. So, a sharply focused eye of the model, makes the photo likable immediately.

DSC_9004-97-7
Sharp focus is on the eyes

2. Let the eyes see: I ll explain this, in simpler terms. I mean, let the photo be such that the model has some place to look to, that the viewer also looks towards the way the model is watching. Let the curiosity be there. If the model is looking towards left, leave some space in the left, and vice versa.

DSC_8996-96-6
She looks to her left, so thats where the space should be

3. Change the angles and point of views: All shots need not be taken right from the eye level. Go up, go down or maybe, just take a step back. They all work wonderfully.

DSC_5801-13
Take a step back, and let her beauty fill the frame
DSC_8515-49-4
Make her look up to you
DSC_0050-7
If needed, get down on the ground too

4. Anticipate Movements:  While shooting at an event, you shall come across conditions where your model is in motion. Observe the patterns and anticipate the movements, be ready and press the shutter at the right moment. With a bit of practice, sharp shots of moving people will not be difficult.

DSC_8973-91-5
Anticipate the pattern
DSC_9196-8-9
Prefocus, be ready and shoot!

5. Go Candid:  Here, you just need to be on the prowl. Keep your eyes peeled for subjects to be shot. Sometimes they notice you and the expression changes, the objective is to shoot before the expression changes. But be advised, the shots may not be as you would have wanted them to be, but then, sometimes, gems emerge too.

 DSC_7548-1-1 DSC_9019-7

6. Bokeh to the rescue:  If you have a background which has distractions, or maybe you just dont want the background, open the aperture wide and let the background fade.

DSC_7859-7-1
The tip of the finger is all I am interested in, rest all should fade
DSC_5815-17
To isolate the model from the distracting background, use a wide aperture

7. Use Flash:  When shooting in the dark, or poorly lit conditions, use the flash as a last resort. With a few test shots, gauge what strength and what shutter speed you need to do justice to your model. Once found, fire away.

DSC_9188-6-8
The flash gives the adequate light and also helps freeze the motion
DSC_8998-6
Combination of Flash and wide aperture helps isolate the model and also provide proper lighting

8. Get close:  Often to capture the expression, you must get very close to your model. But be advised, do not disturb the natural surroundings in the process.

DSC_8434-33-3
Concentration….captured

9. Ask the model to smile: This trick, never gets old. Ask your model to relax and take a seat. Bring out your gear and show them how to take a shot, and when they have relaxed, ask them to smile….voila! You have a genuine and happy smile,

DSC_8338-2-2
Effortlessly beautiful

10. Try Monochrome: For a lot of shots, the monochrome version appears to be of more depth. Try it out, but dont overdo it.

DSC_5865-38
Beauty as I know best

So, there you go. 10 simple tips to get you going on your next portrait shooting trip. Go on, have fun and shoot some wonderful portraits.

Thanks a lot to the wonderful models here: Nikhila, Gowri, Rishika, Shruti, Soma, Mayukh, Shweta, Parthivi, Aakash, Anushree, Yogi and my muse, Tuhina. You all are simply wonderful 🙂

Cheers!!

AtoZ Challenge: PH – B: Bokeh

for Bokeh

Japanese origin word for blur in the background of a photo. Used widely as an aesthetics tool in the photograph to give it a dreamy smooth out-of-focus background. With decrease of the Aperture number, the bokeh effect becomes more distinct and profound. The shapes formed in the bokeh of light sources, varies on the number of blades within the lens. Bokeh can be used creatively by use of filters to produce specific shapes in the photo.

Some Bokeh shots here. For information on aperture, check here. And for the use of filters, check here.

DSC_5495

DSC_5473
This is part of April AtoZ Challenge. A , B  done, 24 more to go! Follow me.

Cheers!!

My Toys’ Story – II

Hi all….another iteration of my toys story! But this time, its the ones that went chugging and am sure, in some point of time we were all fascinated with the train engine, and to have a look within the engine, it was a huge thing of joy, for me, it still is, even today!

DSC_5473
The first one I remember!


DSC_5496
An old memory…really old one!

For the ones who had a look on my page, Showing Off, the star effect in the first photo has been achieved by the use of the same star filter that has been shown in the DIY. So you see, they do work pretty fine.

Go out there and relive the happy moments that you miss, and dont forget to experiment a bit too!
Until next time…
Cheers!